Wednesday, June 28, 2017

How to turn off Peer-to-Peer Windows Update?

High network utilisation happens when there is Windows update, and this contributes to the slow down of internet if not taken seriously. It always has the top bandwidth usage compared to other user internet usage. Windows peer-to-peer update can be turned off by following our how to turn off p2p Win 10 update tutorial.

The default Windows 10 setting uses some sort of a peer-to-peer scheme in distributing updates. For quick solution, you can just turn it off on all Windows 10 machines you deploy. The feature is hidden deep in several options:


Start > Settings > Update & security > Windows Update > Advanced options > Choose how updates are delivered > set to OFF.

This step will stop the Peer-to-peer update default setting of Windows 10 update. However, there are instances that the Windows update service will not stop hogging the bandwidth of the internet connected access point or modem. It might be handy to setup a script to disable the Windows server update service due to this bandwidth usage behaviour and while still giving the user an option to disable the task manually to allow update to push for security like every once a week. For the complete guide on how to Disable Service Host Delivery Optimization Script Windows 10, please follow the linked step.

How to Troubleshot Slow Internet Issue?

Users may experience slow connection. Users will be complaining that a webpage loads for 1 minute. Others may become frustrated why the buffering of the video is long. The following guides will help in checking the internet.

Local Area Connection

Basic Steps:


1. Did you try to conduct power cycle of the modem?
The modem connects your router or PC to the internet. Your internet provider will have their cooper cable, fiber, broadband signal receiver, or satellite signal receiver connected to this device in order for you to receive the internet service of the ISP. The device can be powered on for a long time. Many people rarely turn it off. Others leave it on since they got it installed by the installer are their house. There are modems that might turned off only when there is a power outage. Since the equipment is susceptible to heat and thermal buildup, interference, static buildup, or any other effects of the equipment being on, restarting it can help restore your internet. It is also your diagnosis if the modem causes the issue.

2. Did you try to conduct LAN-to-LAN testing?

You may try to connect the ETPI provided modem to a single computer to confirm. Please make sure to set your IP address in Local Area Connection based on the IP block provided. Here are the steps:

a.) Open ‘Run’ command by pressing the Windows logo on your keyboard and the letter ‘R’ simultaneously.
b.) Type in the command: ncpa.cpl
c.) Once you press the Enter key or click ‘Ok’, the Network Connections window will come up
d.) Right-click the Local Area Connection icon, then click ‘Properties’
e.) Click to select ‘Internet Protocol Version 4 (TCP/IPv4)’. if you are using Windows XP, it is ‘Internet Protocol (TCP/IP)’
f.) Click ‘Properties’ and select ‘Use the following IP address’. Then input the following information:

-IP address: (get from ISP) -Subnet mask: (get from ISP) -Default gateway: (get from ISP) -Preferred DNS server:  ISP DNS -Alternate DNS server:  ISP DNS 2

g.) Click ‘OK’ twice to close the boxes


Advance Steps:


1. Clear Internet cache, browser cookies and history. On any browser, just press CTRL + SHIFT + DELETE simultaneously.

2. Try other Internet browser. If using IE or Chrome, advise to use Firefox. Check if browser is set to use a proxy server.

For IE or Chrome:
a)      Go to Internet Options. They can run the command:  inetcpl.cpl
b)      Under “Connections” tab, click “LAN Settings” then uncheck all boxes. Click “Ok”

For Firefox:
a)      Click “Tools” (press ALT if not showing), then “Options”
b)      Click “Advanced”
c)      Under the “Network” tab, click the “Settings” button, then select the radio button for “No Proxy”. Click “Ok”

3. Please disable, close or exit the programs which might be taking up too much of the Internet bandwidth (e.g. Torrent, Windows Updates, Skype, YM, etc.)

4. Please disable any firewall/anti-virus/filtering software that might be hindering their connection to the Internet.

5. Power cycle the modem by turning off or unplugging the device for 5 minutes.

6. Visit the website http://www.speedtest.net/ and click on ‘Settings’ on top of the page, then select using your ISP server as the ‘Preferred Server’ when you before you begin the test.

7. Ping the DNS server provided by the ISP via Command Prompt or the Network Utility website.

Mobile Internet

1. Make sure you are already using 4G LTE sim if you have 4G capable phone and a 4G covered area.

2. Set your phone to a preferred network. You can do this at Settings> Mobile Network>Set Preferred Network Type> 3G/WCDMA only. This can be done on 3G handsets without 4G LTE area. If it is set to Auto and the signal the phone selects is 2G, that will cause slow internet (even if you have 3G signal).

How to Setup Outlook Mailbox on First Time Use?

Upon logging in to the PC with his credentials, the user can follow the steps below to configure outlook mailbox for first time use. Outlook provides a Welcome Wizard in which the user information is auto-configured based on the log-in account. IT support can provide the following simple instruction to the user. The user can read and do the simple steps as it is only including button clicks.

1. Open Outlook
2. Click next button
3. Click next button
4. Click Finish button
5. Outlook now opens with his mailbox

Email provided is a company resource and will be provided for official business purposes. Many mailbox fill up as non-business related transactions and personal emails go to the employee's assigned email. This will affect the overall storage if no guideline is disseminated. Let the user know to safeguard the email and the password and avoid giving away the emails publicly to avoid spam and viruses. Viruses are often transmitted by email. Limiting exposure of email address by responsible use online can reduce spam senders.

How to remove Bitdefender Endpoint Security uninstall password?

For you to removed or changed the uninstall password of your Bitdefender Endpoint Security please perform the following steps:


1. From you Control Center , go to Policies.

2. Under Policies simply choose the policy which has uninstall password set. ( Simply double clicked the Policy)
     At your case it seems that the DIRECT TO CLOUD AV UPDATE(FOR RELAY SERVER AND LAPTOP)  Policy has password configuration.

3. On your policy,  Under General go to >  Settings > Password Configuration. You can choose either set another password or disable the uninstall password.

4. Click Save so that the policy will take effect.

How to fix printing issue?

Issue is about a user that cant print. Printers can be connected by USB and shared to officemates via Windows printer share. If the printer is LAN capable, it can be directly connected to a network and the printer is shared via a central server or by direct printer detection and setup.

Steps in resolving printing issues include following basic troubleshooting which are the first steps in fixing the problem and a way to gather information for the succeeding steps of troubleshoot.The later part discuss on advance steps in troubleshooting the printer. We follow the guides and steps in the troubleshooting page of the printer or the manual. However if the printer has none of it, or such resources are not available, you can follow the following proven steps in troubleshooting the printer.

1. Make sure basic TS followed:
-          Make sure printer is on
-          Make sure printer is connected to either LAN, or USB cable
-          Note error message
-          Restart printer
2. Depending on error, do appropriate steps:
-          Put paper on tray when paper out
-          Put replacement ink/cartridge when ink/toner low
-          Clear paper jam
3.  If user can print randomly but others don''t have such issue, run ping on user computer. Request time out indicates bad connection.
-          Replace LAN cable of user PC
-          Make sure request time out is minimal (or none)

Some printer like HP LaserJet printer is sensitive to toner/ink level, and often malfunction when the toner is low. Checking ink level can give you clue on whether you have issue caused by low print supply installed on equipment. Make sure printer is not attached to UPS. UPS has power rating and the printer uses a lot of power during startup which the UPS might not able to deliver. It causes electrical problems causing various printer malfunction. Always connect the printer to the power outlet. The printer might not respond to reboot and restart. The printer have static electricity buildup and by pressing the power button while the printer is off, static buildup will be released. Issues in hang up can be resolve by doing this procedure.

If the steps can't restore the printer to its working status, you might need to call the supplier for servicing. Check warranty status. It will be good to keep your warranty notes in case such scenarios happen that you need to have printer repair.

How to Issue Company Standard Signatures?

Company signatures needs to be standardized in order to set a uniform format for employee email signatures. Signatures are important part of email communication. It shows the employee information like full name, the position, and job title. It also shows the contact details such as mobile number, telephone number and the local extension, and the fax number if any.

To standardize part of our corporate communications, IT admins requests everybody in the company to adhere to an issued the templates. This should be used for all email communications with external contacts. Oftentimes the employee is given one template, but for multi-site and multi-account employees, the are given choice for selecting the appropriate template. Employees are given template and needs to replace/fill in appropriate information in the fields.

Common instructions and rules include:
- Do not alter the logos
- Do not alter the format, fonts, and colors
- Do not add emoticons, other images, or quotations

Once users identified the appropriate template for them, they need to change the contents to their name, position/company, mobile number, etc., and follow the steps below for Microsoft Outlook (2013):

1. Highlight all and copy the template that you will use and that you have changed with your information.
2. On your Outlook program, click on ‘File’, then ‘Options’, select ‘Mail’ on the left pane, and click on ‘Signatures’ button on the right.
3. Click on ‘New’ button and type a name for your template.
4. Click on the big box where you can type your content, and paste (Ctrl-V) your copied template.
5. Click OK to save your template.
6. To test, open a new email and see if your signature automatically appears. If not, click on ‘Insert’ on the menu, and clcik on ‘Signature’ button at the top.

How to Set & Cancel Call Forwarding On The Iwatsu ADIX IX-12KTD-2 Phone

How To Set & Cancel Call Forwarding On The Iwatsu ADIX IX-12KTD-2 Phone

Call forwarding can be very helpful when you are busy or away from your desk. Call forwarding allows you to redirect your incoming calls to an internal destination or an external line. You can have your colleagues take calls for you when you’re busy, or you may conduct your business calls on your mobile phone while you’re on the field.
If you have an Iwatsu ADIX IX-12KTD-2 phone, we can guide you through the steps of setting up and cancelling your Call Forwarding feature.
To set the forward destination, you may lift the handset or press SPKR, then press FWD. You will then enter the Call Type you wish to forward:
Press 1 for All Calls
Press 2 for CO Calls only
Press 3 for Intercom Calls only
Next, enter the Flexible Call Forward Mode:
Press 1 to forward All Calls to another extension or hunt group
Press 2 to forward Busy/No Answer Calls to another extension or hunt group
Press 3 to forward No Answer Calls to another extension or hunt group
Press 4 to forward All Calls to an external number, using Personal Speed Dial codes 90-99
For Modes 1, 2, and 3, you will need to enter the extension or hunt group number. For Mode 4, you will need to enter the Personal Speed Dial code.
Wait for a confirmation tone and then you may hang up.
To cancel Call Forwarding, lift the handset and then press FWD. Next, press * then enter the Call Type you wish you cancel:
Press 1 for All Calls (CO/Intercom)
Press 2 for CO Calls only
Press 3 for Intercom Calls only
Wait for a confirmation tone, and then you may hang up.

Tuesday, June 27, 2017

How to Check Your Website Ranking

How to Check Your Website Ranking

It is important that you see the rank of your website on your country. This give you information on how popular your website is. This also shows how your website performed and how it attracted readers and visitors to check your website contents. There are a lot of webpages created every day. Being able to see how your viewers tend to visit your page is important for improving your website contents to have more viewership. That is why there is a way for you to check your rank manually.

A good web ranking tool should be able to provide the following relevant information for you when you check your website rank.

1. Popularity
The web ranking should show how popular your website is. Popularity per country must be shown for targeted interpretation of your sites country specific audience. Not all website has equal viewership for your website. Getting to know how popular your website is on a target country is important.

2. Search Traffic
The website traffic shows your inflow of visitors. It tells the webmaster all visit activities to the site. The higher the number, the better. Knowing that your search traffic is good means your site is performing well.

3. Engagement
Audience engagement means the time spent by visitor to a site. When it is just few seconds, it means that the user have not read the contents of the page that could be either due to low quality contents. Being able to know this will help admins create content rich and quality pages which will make engagement statistic higher bring up other site metrics mentioned with it.

4. Unique Visitors
New sessions for your site is important as retaining returning visitors. Having a constant stream of new visitors is needed for the success of the page. Quality is very important. People look for value for the pages they visit. The more value of the site for the visitors, the greater chance of having new visitors. Visitors tend to share the link of sites relevant to their needs, or the sites that helped them with their particular issue.

5. Audience Geography
This should tell where your audience are from.


Looking for the website to check your traffic? You can go to Alexa.com and enter your website to view information about your site rank.

Saturday, June 17, 2017

How to Fix Excel File Hang

Microsoft Excel is a part of the Microsoft Office suite created by Microsoft that is the world's most popular spreadsheet software. Right now it is available for Windows, MacOS, Android and iOS. Its popularity grew due to its extensive features for formula and calculation, graphing and charts, pivot tables, and Visual Basic for Applications or VBA.


How to Solve Always Available Offline folder not Syncing

Users of Windows computer have option to setup their Sync Center to make a shared network folder to be available offline. In a network, Windows can be set to allow sharing of files and folder resources. This greatly helps in the access of data between computers. The network folder can be used with the access settings to allow certain users have full access, while for others to have limited access like reading only the contents of the shared folder.

Friday, June 16, 2017

How to Map a Network Folder

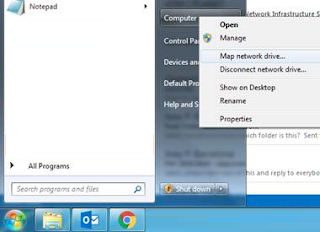
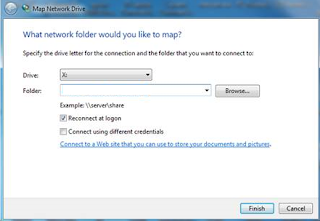
Network folders are created to share folder to intended recipients. More or less the sender uses email to inform the person to open the network folder. However, accessing a network folder will be tedious since the person opening the shared folder needs to open the email and find on the messages which folder link to be clicked. By mapping the drive, the network folder appears with the drive letter. It would be very accessible as it will available the the folder explorer. All mapped drive will be under category Network location as seen on the image below.

In order to create a mapping (shortcut), you may try :
1. Get the shared  folder location from the person sharing the folder
2. Go to Start>Computer>Right Click and select Map Network Drive

3. Put the copied text as seen on picture and click the finish button:

4. You will have a link when you open Computer like this one:


How to Add Local admin using Command Prompt

In setting up a computer, the local admin account is set. It is the first account to used in the system to provide the local administrative access to configure the Wifi access, the network settings, and domain settings. Connecting the computer to the domain network allows organizational administrators to manage the PC as part of the organization and implement the group policy.

Sometimes, the PC become disconnected to the domain and the domain administrator cant make necessary changes to connect back to domain. Rejoining to domain requires local administrator account when the PC is experiencing domain trust relationship. The admin will not be able to login since the cache credentials is not available, or the domain admin account is never logged in to the computer. It is also possible that the local admin password is not known and the admin do not have the password for example, another person setup the laptop and the current admin was not able to reset the password when they still have the access. Due to multiple password changes of the domain admin, the cached domain admin credentials saved on the computer still have the old password. The admin would have the difficulty to use the cached domain admin account.

Prevention is better than cure and the admin can setup local admin account to the computer. It is a matter of implementation based on the policy for IT but it saves time when trying to recover from domain trust relationship problem.

In order to add a local admin to the computer, type the following command via command prompt. It can also be run remotely using Psexec.

net user adminlocal "" /add
net localgroup administrators /add adminlocal

Basically the command in the first line is an instruction to add adminlocal as a username.
The second line adds adminlocal to the local administrators group. Adminlocal username can be any username of choice.

How to fix Microsoft Office frozen white blanked window issue

Microsoft Office products like Excel sometimes freeze and turns into a white window. You know that the program still responds because the up and down scroll buttons still works. We often close the window and the program works normally again. However, without the necessary fix, the issue could repeat itself and can greatly affect productivity. It can also cause data loss if the user suddenly closed the window.

To solve the issue, one can do the following:

1. From your excel, go to File
2. Go to Options>Advanced
3. Under Display, uncheck the Disable Hardware Acceleration
4. Restart the Excel

Hardware acceleration sometimes affect the way the software renders its graphical user interface. It is meant to accelerate graphics by harnessing the graphical processing unit of the computer but sometimes leads to the issue of Office displaying as a white window.

If the above tip does not help, you can try checking the recommended and minimum software and hardware requirements for your Microsoft Office whether it is 2010, 2013 or 2016 version. Keep in mind that running 64 bit Microsoft Office program on a PC with 64 bit operating system and supported processor will be faster compared to running a 32 bit version.

You can also try to repair the Microsoft Office installation. Obtain your Microsoft Office executable installer setup and run it on Maintenance mode to repair any damaged Office program files that would have been affected by 3rd party software, corruption due to aborted windows updates or other causes.

Finally, you can remove the program by un-installation and reinstalling it. It can also go as far as reformating the affected PC.

Thursday, June 15, 2017

How to Connect to Windows VPN

Windows provides built-in feature to connect to a configures RRAS server for your company. By properly configuring the settings of your server, one can connect and work outside of office to access the internal network. By getting your IT administrator to do the configuration, you should be able to connect easily. By continuing to the following instructions require information about hat type of VPN is set so to properly setup the VPN client on your PC.

This option is made for Win 7, and the following instructions will show how to setup Windows VPN client.

1. From Control Panel, navigate into Network and Internet\Network and Sharing Center.
2. Click on Set up a connection or a network
3. Select Connect to a Workplace, and select No, create a new connection
4. Select Use my internet connection (VPN)
5. Enter Internet address and Destination name
Internet address can be the external IP address of the company. Destination name can be set by the user.
6. Click Next, Type your username, password and optional Domain. You can opt for Remember this password to save the configuration. Click on Connect button but you can skip and try later.

Congratulations the settings are already saved and you can connect to the VPN site by checking the internet icon near system date and time. You will see the VPN name you have set and clicking on connect will allow VPN connection.

How to Print Multiple Slides into a Page

PDF documents can contain slide size contents. Printing slides are often done multi-slide into a page since the contents are simple and easy to read. It is also printed as 2 by 3 slide per page in order to minimize the cost of printing.

Please try to print on Adobe Reader with the following options selected:
1. Click Multiple button
2. Set page per sheet as 2 X 3 so you get 6 slides in one page.
3. Then click print to print the document.

See screen shot below which shows the Print Window. Clicking the print button will output the page with multiple slides on it.


Related Posts Plugin for WordPress, Blogger...

SSS Contribution Calculator

Enter your monthly income: